Flanges and Butterfly Valve Installation Guidelines
201405B – AQTTB
Date Issued: 20 May 2014
Aquatherm piping works great in conjunction with flanges with gaskets and butterfly valves in the piping system.
Flanges and Butterfly Valve Installation Guidelines2
For a successful butterfly valve installation in Aquatherm piping the following procedures should be observed:
- Dry-fit the connecting pipe flange adapters and the valve on a bench to ensure proper alignment prior to the actual valve installation.
- Provide bolts and washers for each valve as required.5
- Install the bolts and hand tighten only.
- With the flange faces in contact with the butterfly valve, operate the valve opened and closed a few times to check for interference and binding.
- If there is interference or binding consult the with the Aquatherm Technical team for additional suggestions.
- Dis-assemble the pieces and install them in the pipeline system.
- Spread the pipe flanges apart enough to allow the valve body to be positioned between the flanges without actually contacting the flange surfaces. In particular, be careful in handling the valve so that the neither the valve seat faces, nor the disc are damaged.
- Install all the bolts between the valve and the flanges. Hand tighten the bolts only as necessary.
- Before completing the tightening of the bolts with a wrench, the valve should be carefully opened and closed again to ensure that there is no interference between the valve disc and the flange adapter.
- If there is interference felt, loosen the bolts as needed, move the valve body slightly to adjust/center the valve and eliminate the interference. Re-tighten the bolts.
- Following the sequence shown in the figure below, tighten the bolts evenly to ensure uniform compression of the valve seat against the flange adapter.
- If an actuator is to be attached to the valve, it must be installed and connected to the power supply in accordance with national/local electrical codes. Note that the actuator should always be installed above the centerline of the pipe. Never below the center line.
- Once the valve bolts have been completely tightened, cycle the valve open and closed to ensure that the valve operates fully through its complete range of motion and that no binding is taking place.
- The valve is now ready for use.

Flange2 and Gasket Installation Procedures and Leak Prevention
To obtain a satisfactory seal in any application, whether with Butterfly valves or with flanges and adapters it is important that basic procedures are followed no matter what style of gasket or material is used.
- Inspect the flange adapter sealing surfaces. Check for tool marks, dents or scratches. Radial tool marks on the sealing surface are difficult to seal against regardless of the style of gasket. Ensure that the finish is adequate for the style of gasket being used.
- Examine the gasket. Verify that the gasket material is compatible with the fluid being used in the pipeline. Check for tool marks, shipping and storage damage.
- Inspect and clean the bolts, nuts and washers.
- Lubricate the bolt threads and the nut contact surfaces. Do not install bolts and nuts without lubrication.
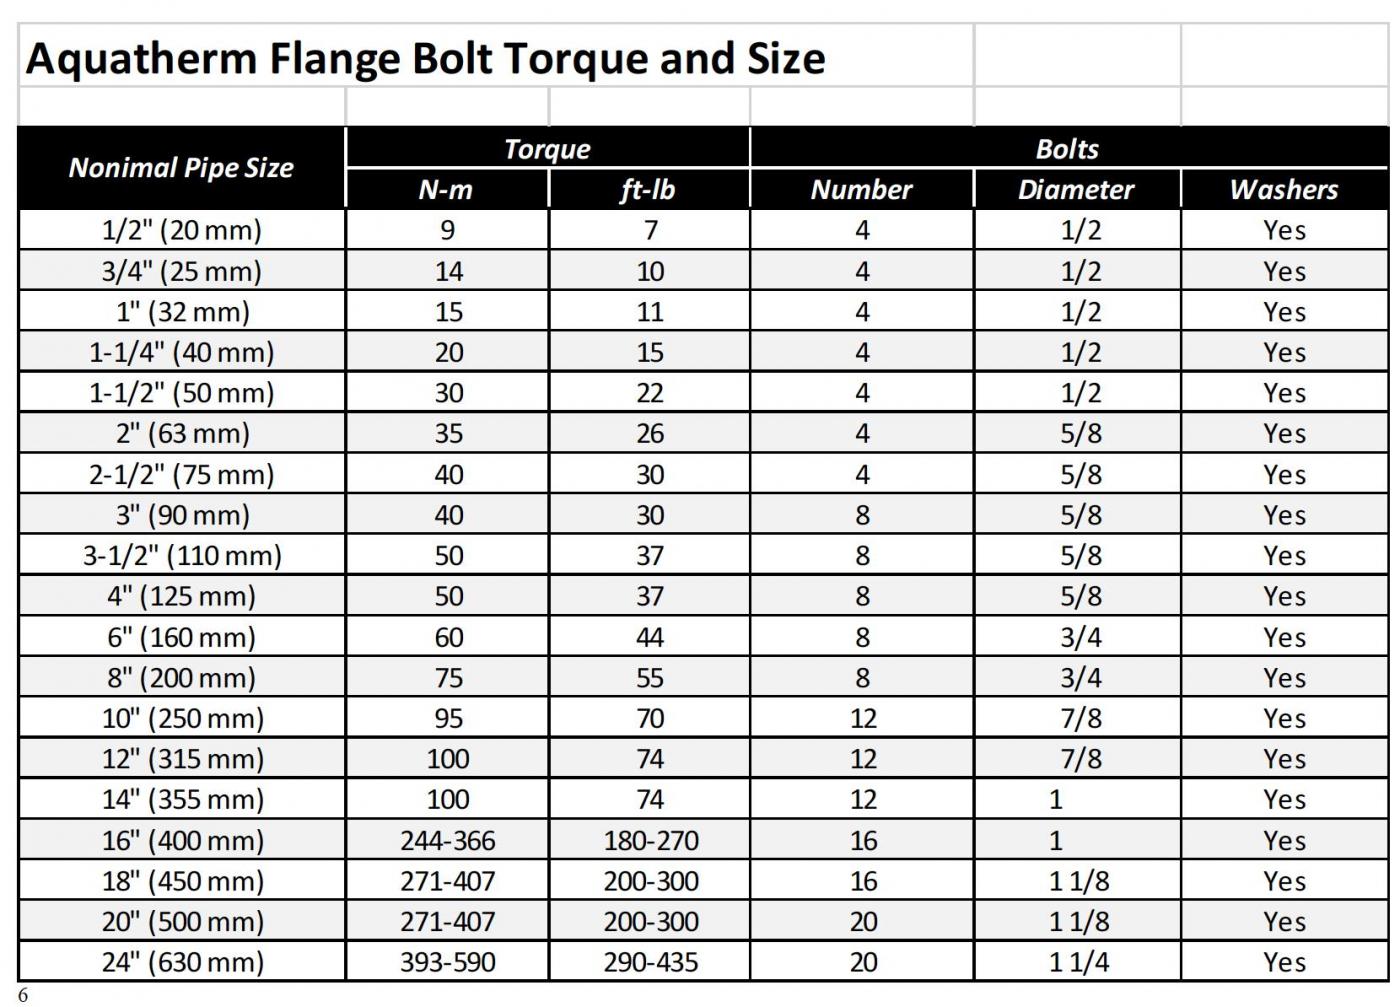
- Tighten the bolts approximately 30% of final torque following the sequence as shown above. Number the bolts to facilitate following the tightening sequence. If the correct tightening sequence is not followed, the flanges may be misaligned making it impossible to obtain a uniform seating of the gasket which may result in leaks during pressure testing or possible blow-out of the gasket later in service.
- Repeat step 5 elevating the torque to 50% – 60% of the final value.
- Continue tightening in the recommended sequence until the final torque value is reached. Each bolt will need to be tightened more than once.
- All gaskets relax after seating. Retightening the flange bolts is recommended to compensate for the relaxation.2 Upon initial successful (leak-free) completion of the flange joint, the system should be operated at normal operating conditions (pressure, temperature, vibration, expansion/contraction) for 24-48 hours and the bolt torques checked and re-tightened to the specified value if any changes have occurred.3
- If leakage still occurs after reaching the recommended flange bolt torque, bolt torque may be increased by 10% and the bolts tightened to the new torque in the same sequence as noted above. A maximum of 20% increase above the recommended torque may be used. If leakage still occurs, the connections should be disassembled, all parts examined for defects, replaced, if necessary and reassembled as noted above.1
- Aquatherm does not recommend direct burial of flanges unless approved by the local authority having jurisdiction and/or the engineer of record for the project.2

Revisions
- 22 Aug 2017
- 30 Oct 2017
- 14 Feb 2018
- 23 Apr 2018
- 16 Aug 2021
- 04 Sept 2021
- 14 Dec 2022